Introduction
Tables are a subject that may be confusing, but by memorizing a few basic rules and learning how to use them, you may find that tables are extremely useful from everything to visual appeal to formatting and structuring your page.
Basic Tables
If you need only one row of tables, though this is not recommended—but, it is recommended to take a look at each one of these tables to see how it works!
Simple Table (No Borders, Backgrounds, Etc.)
{|style="width:680px;"
|column 1
|column 2
|column 3
|column 4
|}
Output:
| column 1 | column 2 | column 3 | column 4 |
Bordered table (Whole thing is in one border.)
{|style="width:680px;border:1px solid #000"
|column 1
|column 2
|column 3
|column 4
|}
Output:
| column 1 | column 2 | column 3 | column 4 |
Bordered table #2 (Each content bit has its own border.)
Code:
{|style="width:680px"
|style="border:1px solid #000"|column 1
|style="border:1px solid #000"|column 2
|style="border:1px solid #000"|column 3
|style="border:1px solid #000"|column 4
|}
Output:
| column 1 | column 2 | column 3 | column 4 |
Adding backgrounds, changing border and etc.
You can add your own background, font size, etc., to these tables! Here's how:
Lets take bordered table from a bit back—you will most likely be using it if you want to have the whole thing set as a background, and one border outlining it. Simply add (style here);(styles size, color, etc.)
for example: the line of code "background:pink;" would change the background to pink. More on applying such can be seen below!
Bordered Table #1.5 (background; font size etc.)
{|style="width:680px;background:pink;font-size:15pt;font-family:comic sans ms;color:black;"
|column 1
|column 2
|column 3
|column 4
|}
Output:
| column 1 | column 2 | column 3 | column 4 |
I forgot to mention—yes, if we took Bordered Table #1.5 and combined it with Bordered Table #2, we could still be able to give each column its own border and stuff! It looks a bit like an outline, or a slight glow.
{|style="width:680px;background:pink;font-size:15pt;font-family:comic sans ms;color:black;"
|style="border:1px solid #000;background:#add"|column 1
|style="border:1px solid #000;background:#add"|column 2
|style="border:1px solid #000;background:#add"|column 3
|style="border:1px solid #000;background:#add"|column 4
|}
Output:
| column 1 | column 2 | column 3 | column 4 |
Regular tables
Tables that have information UNDER the headers. This can be used by applying |- to the basic tables above. (make sure to remove the stuff after <-- if you are using)
{|
| header <-- this will be the top information, along with all the ones that start with "|".
| header
| header
| header
|-  <-- this line makes the next content move down a line, hence making the table a regular table which displays information.
| content <-- the content below it.
| content
| content
| content
|}
Output:
| header | header | header | header |
| content | content | content | content |
You can customize these just like the tables above—so no worries!
Code:
{|
| style="border:1px solid black;background:pink;| header
| style="border:1px solid black;background:pink;| header
| style="border:1px solid black;background:pink;| header
| style="border:1px solid black;background:pink;| header
|-
| style="border:4px solid red;background:yellow;| content
| style="border:4px solid red;background:yellow;| content
| style="border:4px solid red;background:yellow;| content
| style="border:4px solid red;background:yellow;| content
|}
Output:
| header | header | header | header |
| content | content | content | content |
Complex tables
This below is a bit more of a trickier version of the basic tables above, but it allows for easier use of rowspan and colspan- which will be explained later on.
Code:
{| class="article-table"
! Header Text Goes Here
! Header Text Goes Here
|-
| Text Goes Here
| Text Goes Here
|-
| Text Goes Here
| Text Goes Here
|}
Output:
| Header Text Goes Here | Header Text Goes Here |
|---|---|
| Text Goes Here | Text Goes Here |
| Text Goes Here | Text Goes Here |
Code:
{|
! Header
! Header
|-
| Content
| Content
|}
Output:
| Header | Header |
|---|---|
| Content | Content |
Article Tables
This is a single boxed article table.
Code:
{|class="article-table"
!Header Text Goes here
|-
|Text Goes here
|}
Output:
| Header Text Goes here |
|---|
| Text Goes here |
How to make and add boxes is quite easy. To add a header, just add another exclamation mark under the other one, so it would look like this:
{|class="article-table"
!Header Text Goes Here
!Header Text Goes Here
|-
|Text Goes Here
|Text Goes Here
|}
Output:
| Header Text Goes Here | Header Text Goes Here |
|---|---|
| Text Goes Here | Text Goes Here |
To create a new line of boxes, add a
|-
In between the different labels. Like so
{|class="article-table"
!Header Text Goes Here
!Header Text Goes Here
|-
|Text Goes Here
|Text Goes Here
|-
|Text Goes Here
|Text Goes Here
|}
Output:
| Header Text Goes Here | Header Text Goes Here |
|---|---|
| Text Goes Here | Text Goes Here |
| Text Goes Here | Text Goes Here |
How to Customize Different Cells
Here's how you can customize each box in the article tables. In front of the text you have to put a |style="put what you want to style here", and the same for the headers. For example, here I'm turning the boxes orange. Code:
{|class="article-table"
!Header Text Goes Here
!Header Text Goes Here
|-
|style="background-color: #FFD700;"|Text Goes Here
|style="background-color: #FFD700;"|Text Goes Here
|-
|style="background-color: #FFD700;"|Text Goes Here
|style="background-color: #FFD700;"|Text Goes Here
|}
Output:
| Header Text Goes Here | Header Text Goes Here |
|---|---|
| Text Goes Here | Text Goes Here |
| Text Goes Here | Text Goes Here |
HTML Table
Here's the basic code to make a table using HTML:
<table>
<tr>
<th>Column One</th>
<th>Column Two</th>
<th>Column Three</th>
</tr>

<tr>
<th>1</th>
<th>2</th>
<th>3</th>
</tr>

<tr>
<th>1'</th>
<th>2'</th>
<th>3'</th>
</tr>
</table>
Result:
| Column One | Column Two | Column Three |
|---|---|---|
| 1 | 2 | 3 |
| 1' | 2' | 3' |
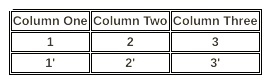
To add a border around the table:
table, th, td {
  border: 1px solid black;
}
Result:
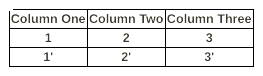
To remove the double border:
table, th, td {
  border: 1px solid black;
  border-collapse: collapse;
}
Result:
You can put the border style codes in WikiText editor one by one, but putting it into the css editor would be much easier and faster. Warning that putting it into the css editor would effect all the table, td, and th tags!
More information coming soon!