Template parameters are a basic feature of templates on wikis. They allow users to customize templates when using them. When someone writes code for a template, they can include parameters.
Parameters let you specify details about a template. Each template may have 0, a few, or many parameters included. A template's page should tell you about your parameter options. Usually, template creators and editors use template data to describe your options.
Templates are similar to functions in programming.[1] (They take in input and produce an output.)
If you don't know what templates are, we recommend you learn about them first. Once you understand the basics, come back here.
Specifying parameters while using userboxes
Userbox example
Let's use the userbox template {{User loves Coding Help Wiki}} as an example. If you'd like, open it in a new tab or window as you follow along. You could even try testing it in your sandbox.
The userbox's template page describes a few parameters. They only accept certain inputs. (This is due to use of a #switch parser function, which we won't get into right now.) The parameters we'll explore are:
- verb: A few verb choices for you to select
- color: The color of the box
- theme: Color theme (pastel, dark, or "darker left pastel")
Note that parameter names are case sensitive.[2] So "color" will work but "Color" and "COLOR" won't.
Its source editor code is {{User loves Coding Help Wiki}}. When we type this in source mode, the result is:
| This user loves the Coding Help Wiki. |
Let's say we want a different color instead of blue. The page lists color options. Purple is one of them, so let's try that. Here's where we'll use a parameter. In the visual editor, you edit template parameters through the template data dialog box. In source mode, it looks like this:
{{User loves Coding Help Wiki|color=Purple}}
We use a pipe (|) as a separator, then the parameter name (color) with an equals sign to choose the value (Purple). And the result is:
| This user loves the Coding Help Wiki. |
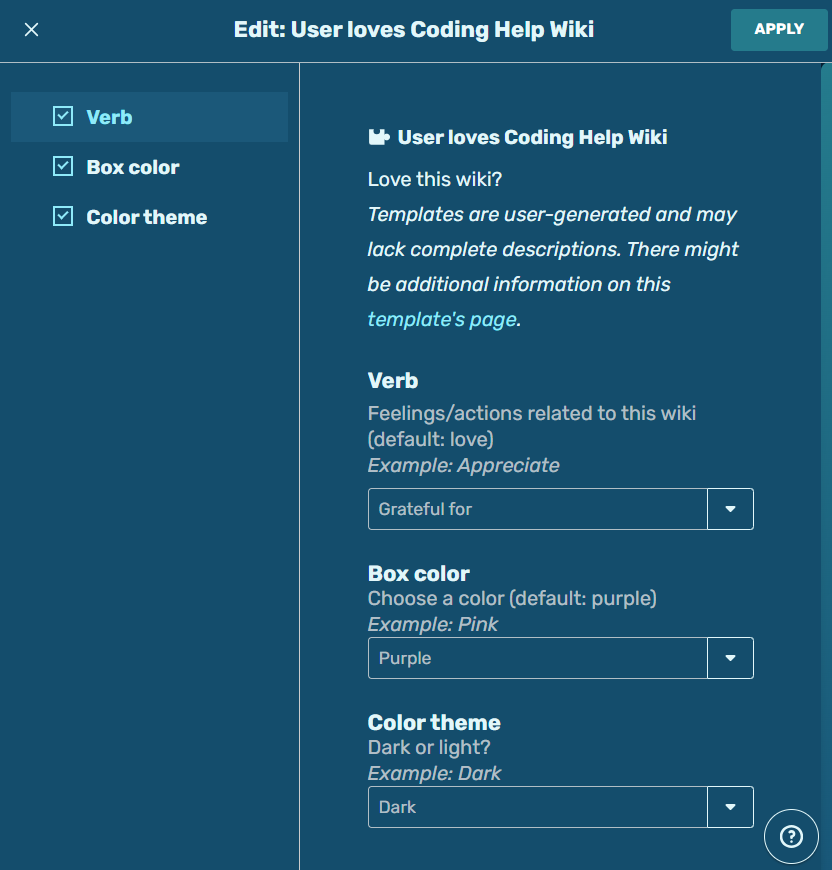
Adding template parameters using template data in the visual editor. The end result is the same.
You can keep adding parameters like this. For example, let's say we want to use dark theme (theme=Dark) and change the verb (verb=Grateful for). We just use more pipes as separators and code it like this:
{{User loves Coding Help Wiki|color=Purple|theme=Dark|verb=Grateful for}}
And the changes get applied:
| This user is grateful for the Coding Help Wiki. |
Attention template example
Next, let's explore the {{Attention}} template. Unlike the userbox, this template includes some options where you can type whatever you want. By default, it looks like this:
|
It lets you type reasons why a page might need attention. The parameter is named "reason," and you can put in anything you want. Let's have some fun and make the reason be "simply too beautiful and perfect for human eyes."
{{Attention|reason=simply too beautiful and perfect for human eyes}}
And here's our result:
|
Some templates have constraints on parameter input and some don't. You can always check a template's page to know what you can and can't do with it.
Adding parameters when creating or editing a template
There are two types of parameters: named and unnamed.
- Named: You give the parameter its own name, like "color" or "reason."
- Usually, people name their parameters. It's easier to read and keep track of named parameters.
- Unnamed: The parameter is given a number, like "1" or "2." This represents the order in which the parameters get specified.
- This is done less often. But sometimes, templates with only one or two parameters might use this (e.g. {{Template link}}).
A parameter name is wrapped in 3 curly braces. For example, let's say we're making a very simple template and we want to let users choose the text color. We'll name the parameter "textColor." And it'll look like: {{{textColor|}}}
<div style="background-color: white; color: {{{textColor|}}};">
Hello! It's nice to see you!
</div>
The inclusion of the pipe symbol (|) functions like a logical OR. In this case, it means "or nothing" (since nothing is after the pipe). So if users don't specify a text color, then nothing will be there. After all, we don't want our CSS literally saying "color: {{{textColor}}}" when the template gets used.
Default values
We can use the space after the pipe to specify a default value. For example, maybe we'd like to set a default text color in case the user doesn't choose one. To use black as the default, we'd do {{{textColor|black}}}. So we get textColor, or if textColor doesn't exist, we get black.
<div style="background-color: white; color: {{{textColor|black}}};">
Hello! It's nice to see you!
</div>
We can add more parameters. Let's add 3 more:
- bgColor, which controls background color. Let's give it a default value of white.
- padding, because padding is good design sense. Let's do a default of 10px.
- styles, where users can directly type CSS styles. No default needed.
- message, where users can include an optional message after "It's nice to see you!" Note how we put a space before it so that the first word of the message won't touch the exclamation point. And the pipe ensures that if the user doesn't write a message, nothing will appear there.
<div style="background-color: {{{bgColor|white}}}; color: {{{textColor|black}}}; padding: {{{padding|10px}}}; {{{styles|}}}">
Hello! It's nice to see you! {{{message|}}}
</div>
Parser functions
- Main article: Parser functions
You can use parser functions alongside template parameters for enhanced options. Here's an example of an #if conditional. If the userName parameter gets specified, then it'll include the name in the message. For example, if the name Jane is entered, it'll say "Hello, Jane!" If not, it'll say "Hello!"
<div style="background-color: {{{bgColor|white}}}; color: {{{textColor|black}}}; padding: {{{padding|10px}}}; {{{styles|}}}">
{{#if:{{{userName|}}}|<!-- then -->Hello, {{{userName|}}}! | <!-- else --> Hello!}} It's nice to see you! {{{message|}}}
</div>
Go to our parser functions page to learn more.
Miscellaneous notes
- Templates can call other templates and pass parameters to them.[3] For example, check out {{Userbox themed}}. It calls {{Userbox}}, and much of its code is just passing along parameters.
- If you accidentally specify a parameter twice (e.g.
|color=black|color=MidnightBlue), the last entry will be used.[3]
Best practices
Simple, clear names are usually best for your parameters. For example, "textColor" or "list1style" give the user a pretty good guess of what the parameter does.[4]
Add template data to explain your parameters. This is especially helpful when people use the dialog box in the visual editor. Good template data makes templates easy to use.
Use a pipe symbol inside your parameters unless you have a good reason not to.
See also
- Lua
- Parser functions
- Templates
- Template data
- Userboxes
External links
- Help:Template parameters at Community Central
References
- ↑ Help:Template, Wikipedia
- ↑ Editing Wikitext/Making Templates A101, WikiBooks
- ↑ 3.0 3.1 Help:Templates#Parameters, MediaWiki
- ↑ Help:Template parameters, Fandom Community Central