In regular CSS, adding image backgrounds is easy. But on Fandom wikis, images work differently, and that can lead to challenges. Luckily, our devs have found ways to make background images work on Fandom.
Remember accessibility and readability as you code. Always specify a fallback color and a text color with good contrast. Background images shouldn't distract from your content. But when done well, they can enhance the beauty of a page.
Template method
On the Coding Help wiki, we have a {{Background image}} template. It uses z-index as a workaround to create a box with a background image. It looks like this:

Here's how to add it:
- Visual editor: Edit the page where you want to use the template. Go to Insert > Template. Start typing "Background image" and select it. Then fill out the parameters in the dialog box.
- Source editor: Edit the page where you want to use the template. Type
{{Background image}}. Then begin filling out parameters, like{{Background image|image=BG MissLunaRose Spring Teal Circle.png}}. (It helps to have the template's page open in another tab to remind you what the parameters are.)
If you want to do this on a different wiki, you'll need to create the {{Background image}} template there. Make the template on the wiki and then copy-paste the code from our wiki.
Code method
You'll need to use CSS properties like z-index and position to get this to work. Even then, there are limitations.
Here's a simplified version of the code that {{Background image}} uses:
<div style="position: relative; overflow: hidden; width: 400px; height: 225px; background-color: white; color: black;">
<div style="position: relative; z-index: 2; padding: 10px;">Text goes here.</div>
<div style="position: absolute; left: 0; top: 0; z-index: 1; opacity: 0.5;">[[Image:BG MissLunaRose Spring Teal Glitter.png|400px]]</div>
</div>
Let's go through it by line number:
- This line creates the outer container.
- The position is relative. This property ensures things display properly.
- Width and height are set to match the image size.
- The background color and text color ensure the results will be readable.
- This is the text container.
- The relative position allows things to stack.
- The z-index of 2 indicates that it goes in front.
- Padding ensures our text doesn't touch the edge. (It's just good design sense.)
- This line handles our image.
- The absolute position, with left 0 and top 0, places it at the top left and lets it overlap with other elements.
- The z-index of 1 is smaller than 2, so it'll go behind the text container.
- The opacity of 0.5 fades the background, which is nice for readability. (You can adjust this depending on what looks best for your image.)
- Then we have a regular Fandom image inside. It's one of our free background images.
- This line closes the outer container.
This isn't the normal way to do background images. In Fandom, we don't have access to regular image CSS features like background image tiling.
Best practices
- See also: Accessibility
When you use a background image, you should always:
- Specify a text color that has good contrast against the background.
- Specify a fallback background color in case the image doesn't load.
- Choose an accessible background image. Avoid things that are bright, chaotic, or cluttered. Your work should be easy to read.
Background images should never harm user experience. Every piece of code you write should make things better (or at least neutral), never worse. This ensures your code is pleasant and user-friendly.
Loud or busy background image?
Maybe you love your image, but the results are hard to read. For example:

You have a few options:
Remember, the user's needs come first! Find something that helps user experience instead of harming.
CSS for non-wikis
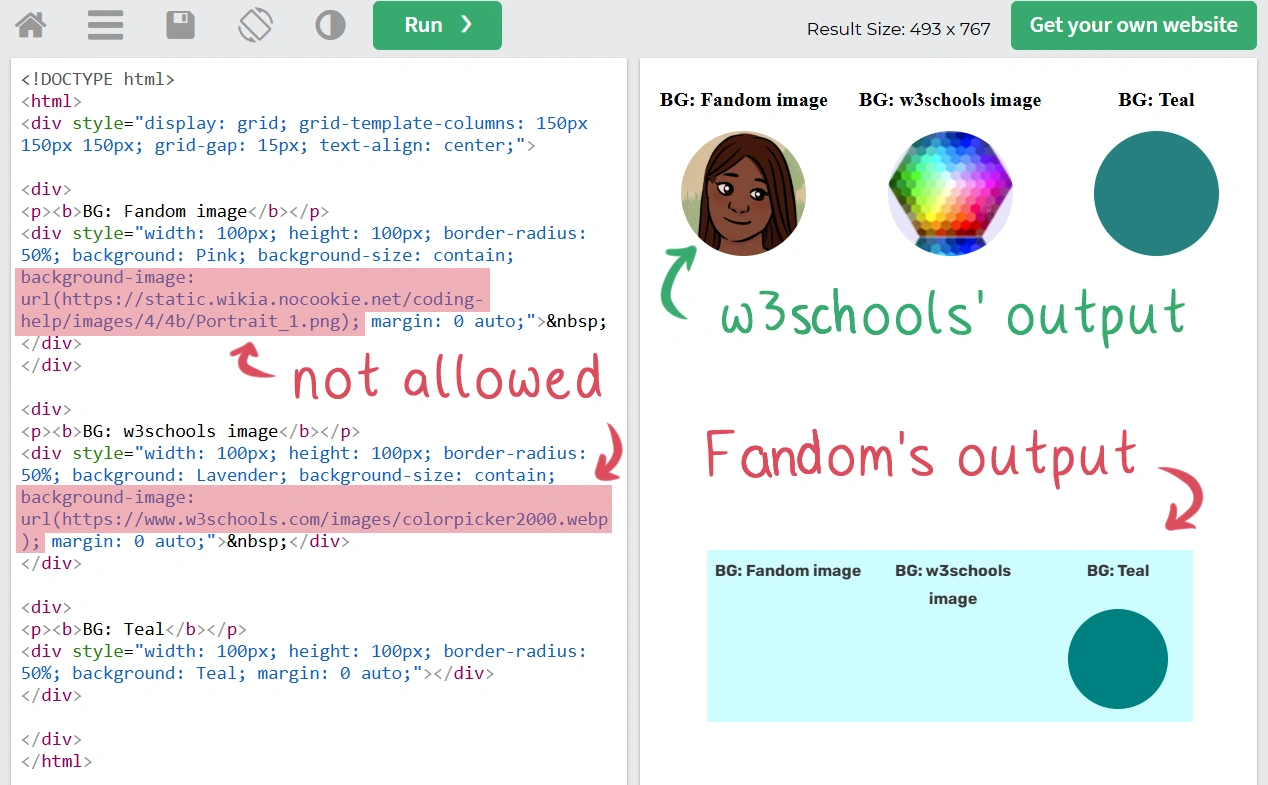
| This code does not work on Fandom. You can use it on external websites, like a personal portfolio. But it won't work here. | |
Example code that works in w3schools but not Fandom. Wikis have different rules!
On non-wiki websites, you can create background images with the background-image property.[1] It would look something like this:
.example { background-image: url(example.png); }
By default, the background will repeat to cover the element if needed.[2] You can stack background images, with the first one in the list appearing in front. You can also use this trick to specify a fallback color in case the background image doesn't load.[3] Here's an example:
.example { background-image: url(front-image.png), url(back-image.png), LightCyan; }
You can use this on non-wiki websites, such as a personal project or portfolio.
See also
You can find some free background images at Category:Free background images.
External links
- Help:Adding Images at Community Central
References
- ↑
background-imageCSS property, MDN - ↑ CSS Background Image, w3schools
- ↑ Coyier, Chris. background-image, CSS Tricks